
Getting started
You must be registered with Workscape before you begin.
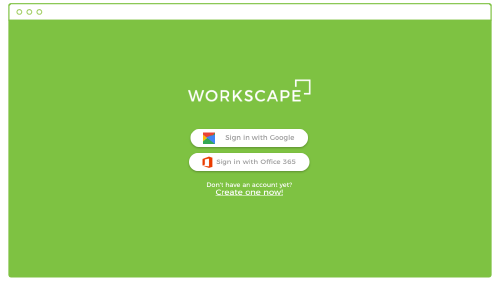
1. Go to dash.workscape.io and create a new account under the sign in options.
2. On the next screen, sign in with your calendar’s admin account (ex. calendar@workscape.io). This is the account that will be used to book meetings with and will link Workscape to your company’s calendar.
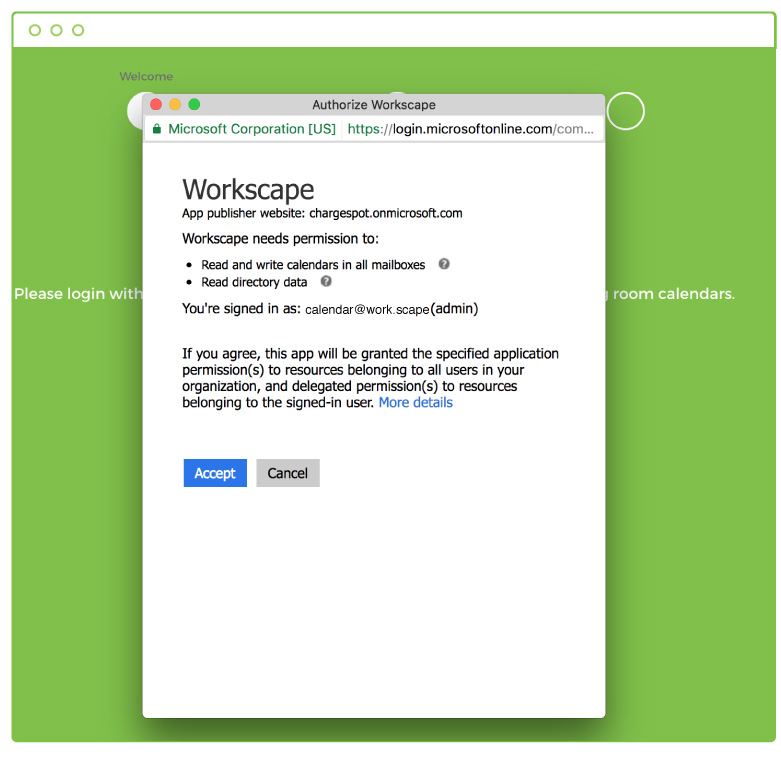
3. Workscape needs permission to book and end meetings in your office’s calendar. This ensures proper syncing of your meetings. Click accept to continue.
4. Follow the onboarding screens, fill out any required forms, and give booking access to your team. The information you create during onboarding can be edited later under Settings.
Creating Office 365 room resources
Meeting room resources are used to link your bookable spaces and meetings to your company’s Office 365 calendar.
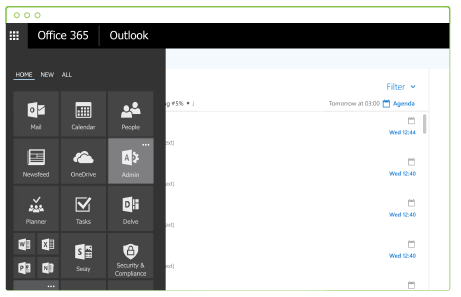
1. Log into https://login.microsoftonline.com/ with your admin credentials.
2. Navigate to the Admin panel in the menu.
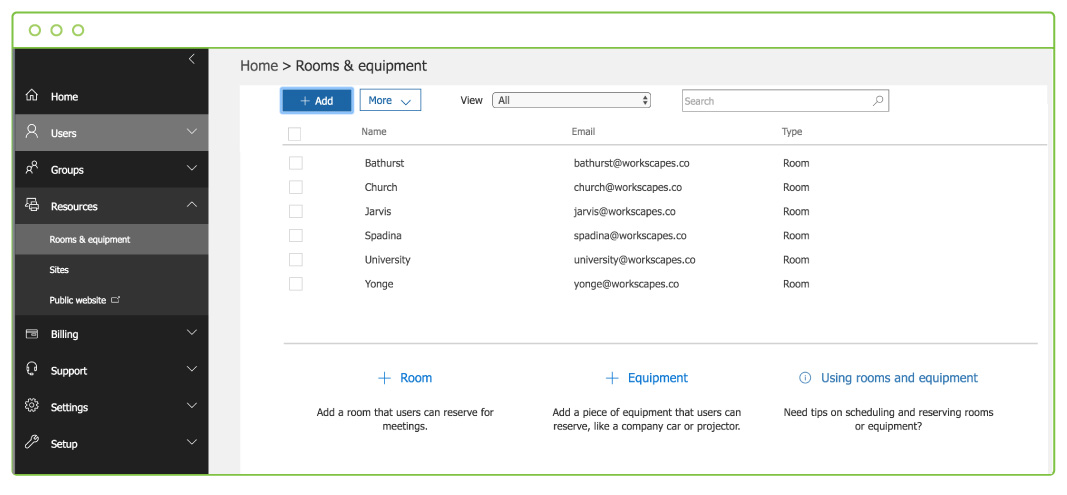
3. Navigate to Resources > Rooms & equipment. Create a room resource by clicking “+ Add”. These resources can now be attached to your bookable spaces in Workscape.
Managing Floors
1. In the Spaces page of the Workscape Dashboard, click “add floor” to begin creating a new floor.
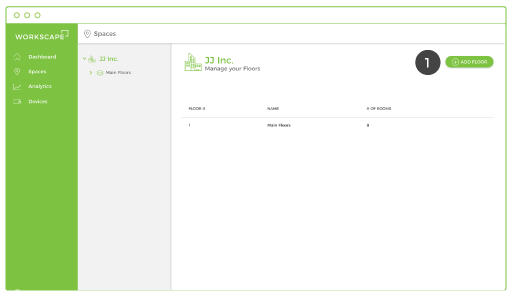
2. From the pop-up, add the floor number and name, then click create.
The floor is now available from the dropdown list and bookable spaces can be added.
3. Existing floors can be edited by hovering over the floor list and clicking edit. Here you can edit the names of floors and update their floor plan images.
*Deleting a floor will also delete all rooms attached to the floor.
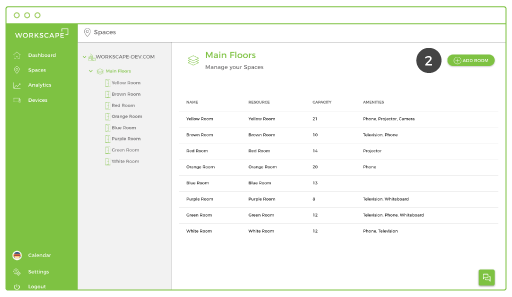
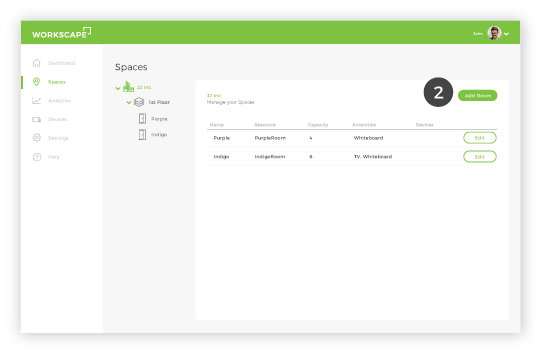
Managing bookable spaces
1. In the Spaces section of the Workscape Dashboard, select the floor you would like to create your new space on from the dropdown menu.
*Note: You must have a floor created before creating a room. To create a floor see Managing Floors.
2. Click “Add Space” to begin creating a new bookable space.
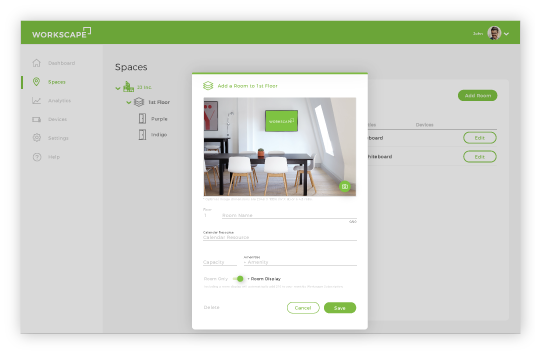
3. In the room editor pop-up, fill in the room’s information and upload a photo of the room. Your amenity list can be edited under Settings. This photo will be used on the mobile app and the rooms display. The photo should be a minimum of 2048px by 1536px and should not exceed 500kb.
If you do not have a photo of the room yet, you can use the default image.
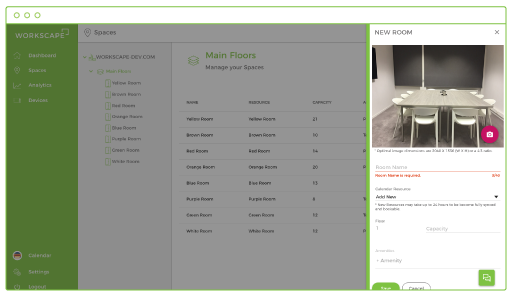
4. Link the room to an Office365 Meeting Room resource. The dropdown list will only show resources that have not been linked to a room yet.
For creating Meeting Room resources using your Office 365 account, please see Creating Office 365 Resources.
5. Save your new bookable space.
*Note: It may take up to 24 hours for the room to become fully synced and bookable.
View the status of your rooms on the room list.
Edit any existing room by navigating to the floor it’s on and clicking the edit button in the room list.
Settings
Integrations
This tab shows all apps integrated with Workscape.
Login Pin
This pin is used for a quicker, easier set up when logging into the Workscape Room Display app.
Learn how to set up your displays here.
Location
View and edit the location of your office.
Floors
Edit your existing floor information. Click a floor to edit or delete it.
*Deleting a floor will also delete all rooms on it.
Amenities
1. Add new amenities to your list by typing in an amenity and clicking add. Your new amenity can now be added to bookable spaces.
2. Edit and delete amenities by hovering over an item in the list to bring up the options.
Onboarding your team
It’s time to introduce your office to Workscape! Use our email template or feel free to write your own.
If you have the Workscape Basic subsciption:
Hi [employee name],
Workscape, a new meeting room booking experience, is coming to the office. With Workscape, you will be able to find and book meeting rooms from anywhere in the office, while avoiding scheduling conflicts.
Some features include:
- Meeting room displays that make it easy to see whether a room is available. Book and browse other rooms right from the display, or view the room’s schedule.
- The Workscape mobile app allows you to browse rooms and schedule meetings from anywhere.
- Find and book rooms straight from your browser using the Workscape web app.
Simply log in with your work email account to get started.
For the full user guide, visit: www.workscape.io/guide/user-guide/
If you have the Workscape + Sensors subsciption:
Hi [employee name],
Workscape, a new meeting room booking experience, is coming to the office. With Workscape, you will be able to find and book meeting rooms from anywhere in the office, while avoiding scheduling conflicts.
Some features include:
- Meeting room displays that make it easy to see whether a room is available. Book and browse other rooms right from the display, or view the room’s schedule.
- The Workscape mobile app allows you to browse rooms and schedule meetings from anywhere.
- Find and book rooms straight from your browser using the Workscape web app.
- Presence detection sensors free up rooms if the room goes unused or if a meeting ends early, maximizing the availability of our meeting rooms.
- Workscape will also automatically send you reminder emails if you are late for a meeting.
Simply log in with your work email account to get started.
For the full user guide, visit: www.workscape.io/guide/user-guide/
Getting started
You must be registered with Workscape before you begin.
1. Go to dash.workscape.io and create a new account under the sign in options.
2. On the next screen, sign in with your calendar’s admin account (ex. calendar@workscape.io). This is the account that will be used to book meetings with and will link Workscape to your company’s calendar.
3. Workscape needs permission to book and end meetings in your office’s calendar. This ensures proper syncing of your meetings. Click accept to continue.
4. Once on the Spaces screen, create your first room to get started.
Creating Office 365 room resources
Meeting room resources are used to link your bookable spaces and meetings to your company’s Office 365 calendar.
1. Log into https://login.microsoftonline.com/ with your admin credentials.
2. Navigate to the Admin panel in the menu.
3. Navigate to Resources > Rooms & equipment. Create a room resource by clicking “+ Add”. These resources can now be attached to your bookable spaces in Workscape.
Managing Floors
1. In the Spaces page of the Workscape Dashboard, click “add floor” to begin creating a new floor.
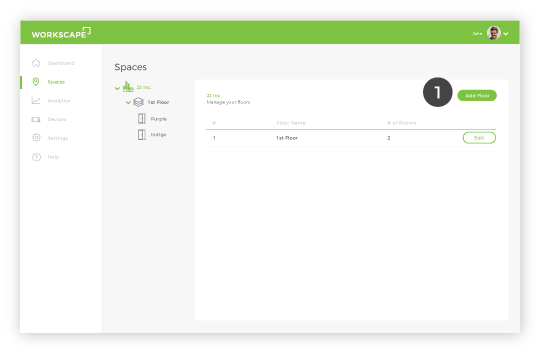
2. From the pop-up, fill in the floor number and name, then click create.
The floor is now available from the dropdown list and bookable spaces can be added.
3. Existing floors can be edited by clicking edit in the floor list.
*Deleting a floor will also delete all rooms attached to the floor.
Managing bookable spaces
1. In the Spaces section of the Workscape Dashboard, select the floor you would like to create your new space on from the dropdown menu.
*Note: You must have a floor created before creating a room. To create a floor see Managing Floors.
2. Click “Add Room” to begin creating a new bookable space.
3. In the room editor pop-up, fill in the room’s information and upload a photo of the room. Your amenity list can be edited under Settings. This photo will be used on the mobile app and the rooms display. The photo should be a minimum of 2048px by 1536px and should not exceed 500kb.
If you do not have a photo of the room yet, you can use the default image.
4. Link the room to an Office365 Meeting Room resource. The dropdown list will only show resources that have not been linked to a room yet.
For creating Meeting Room resources using your Office 365 account, please see Creating Office 365 Resources.
5. Save your new bookable space.
*Note: It may take up to 24 hours for the room to become fully synced and bookable.
View the status of your rooms on the room list.
Edit any existing room by navigating to the floor it’s on and clicking the edit button in the room list.
Settings
Integrations
This tab shows all apps integrated with Workscape.
Domains
Anyone on these connected accounts will be able to create meetings in your Workscape system. If the email is user@yourdomain.com, type in yourdomain.com, then click add.
Login Pin
This pin is used for a quicker, easier set up when logging into the Workscape Room Display app.
Learn how to set up your displays here.
Location
View and edit the location of your office.
Admin Users
These accounts will be able to view and edit in the Workscape Dashboard. The original account that has it’s calendar connected to Workscape cannot be removed.
Amenities
1. Add new amenities to your list by typing in an amenity and clicking add. Your new amenity can now be added to bookable spaces.
2. Edit and delete amenities by hovering over an item in the list to bring up the options.
Onboarding your team
It’s time to introduce your office to Workscape! Use our email template or feel free to write your own.
If you have the Workscape Basic subsciption:
Hi [employee name],
Workscape, a new meeting room booking experience, is coming to the office. With Workscape, you will be able to find and book meeting rooms from anywhere in the office, while avoiding scheduling conflicts.
Some features include:
- Meeting room displays that make it easy to see whether a room is available. Book and browse other rooms right from the display, or view the room’s schedule.
- The Workscape mobile app allows you to browse rooms and schedule meetings from anywhere.
- Find and book rooms straight from your browser using the Workscape web app.
Simply log in with your work email account to get started.
For the full user guide, visit: www.workscape.io/guide/user-guide/
If you have the Workscape + Sensors subsciption:
Hi [employee name],
Workscape, a new meeting room booking experience, is coming to the office. With Workscape, you will be able to find and book meeting rooms from anywhere in the office, while avoiding scheduling conflicts.
Some features include:
- Meeting room displays that make it easy to see whether a room is available. Book and browse other rooms right from the display, or view the room’s schedule.
- The Workscape mobile app allows you to browse rooms and schedule meetings from anywhere.
- Find and book rooms straight from your browser using the Workscape web app.
- Presence detection sensors free up rooms if the room goes unused or if a meeting ends early, maximizing the availability of our meeting rooms.
- Workscape will also automatically send you reminder emails if you are late for a meeting.
Simply log in with your work email account to get started.
For the full user guide, visit: www.workscape.io/guide/user-guide/