
Device setup
1. Connect the iPad to your office’s wifi.
2. Download the Workscape Meeting Room Booking Display app from the app store.

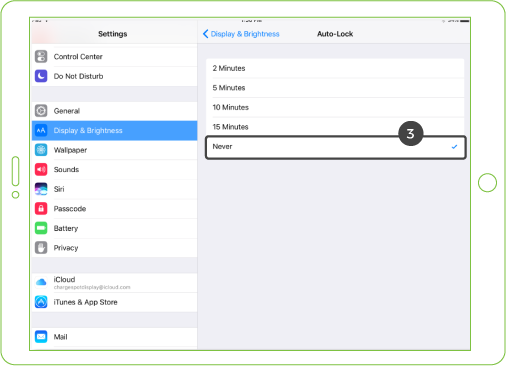
3. Turn off auto-lock to keep the display on.
iOS 9: Settings > General > Auto-Lock > change Auto-Lock to Never.
iOS 10: Settings > Display & Brightness > Auto-Lock > change Auto-Lock to Never.
4. Turn on Guided Access to keep employees from exiting the Workscape app.
Settings > General > Accessibility > Guided Access
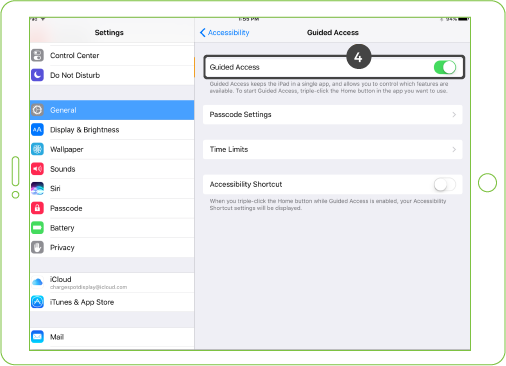
5. Open the Workscape Meeting Room Display app and press the home button 3 times to activate Guided Access. When the Guided Access screen appears, click start.
Admin features overview
Creating a room from the display
1. Sign in to the Workscape meeting room display app using your admin credentials or Workscape Pin, click the “Create a New Room” button from the left hand side of the screen.
2. On the next screen, fill in the room’s information and take or upload a photo of the room. This will be used on the display and the mobile app. The photo should be a minimum of 2048px by 1536px and should not exceed 500kb.
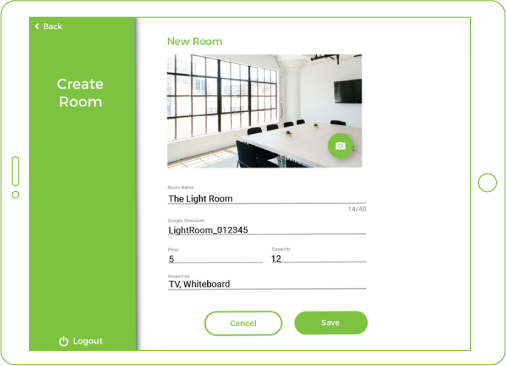
3. Link the room to a Google Resource or O365 Meeting Room Resource to connect it to your office’s calendar.
4. Save your new bookable space.
*Note: It may take up to 24 hours for the room to become fully synced and bookable.
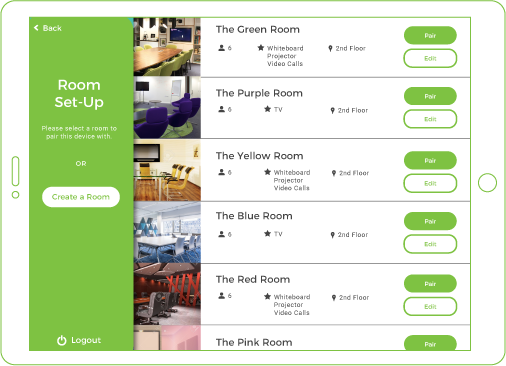
Pairing a room to the display
Navigate to the room set-up screen by logging in to the room display or from the app settings screen. Simply click “Pair” from your available list of rooms to connect the meeting room display app to the room.
App Settings
The room display app settings are located in the upper left corner of the display screen. You must use your device passcode to access the settings screen. The default passcode is 0000.
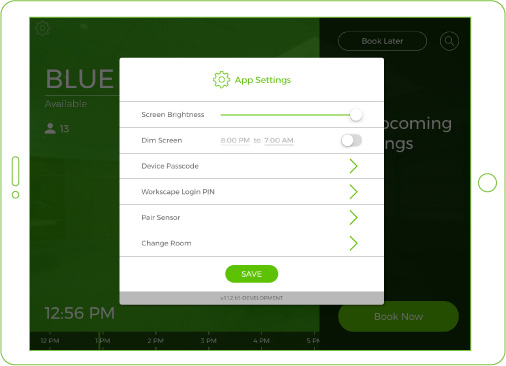
Dim Screen
Save power during off work hours by using the dim screen function. The screen will automatically brighten when the work day starts.
Device Passcode
Change your device passcode here. The default is 0000.
Workscape Login Pin
This pin is used for faster setup when installing multiple room displays. You can log in to the app using this pin instead of typing out your admin credentials every time. This pin can be generated in the app settings or in the Workscape Admin Console.
Pair Sensor
For Workscape + Sensor users
Learn how to pair your Workscape Smart Sensor here.
Change Room
This will take you to the room set up screen where you can pair the display to a different meeting room.
*Note: The iPad can be set to display time in 24 hr notation if you wish, but the Workscape Web App will show time in 12 hour notation.
Mounting your meeting room display
It is recommended that you set up the iPad meeting room display app and bookable space before mounting the device.
Please note that this is our recommended installation guide. Installing each meeting room display may differ depending on wall surface and room layout.
Click on the image to see where to buy each product.
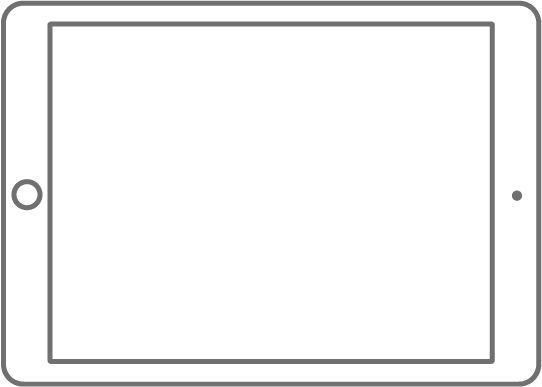
iPad mini 2
Any iPad will work. Be sure to get the correct mounting frame.
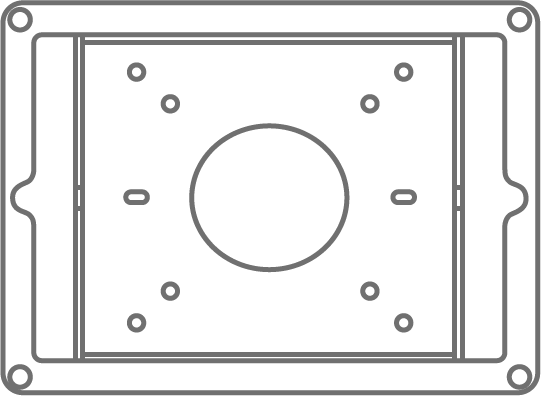
Secure Mounting Frame
See below for mounting options.
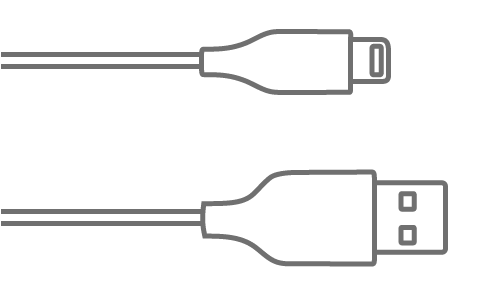
Charging Cable
Any iPad compatible charging cable will work. Choose a length to best suit your space.
Mounting Options
Basic Wall Mount
Best for standard wall mounting.
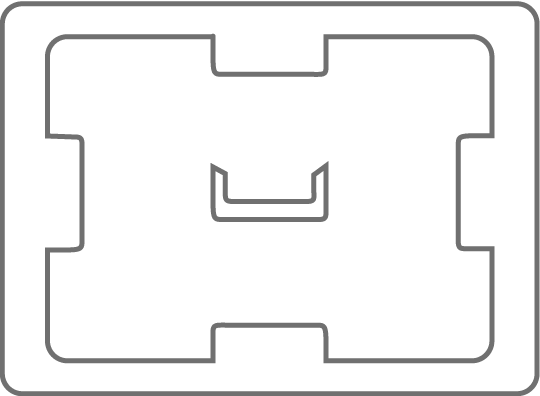
PadTabs
For mounting directly on surfaces such as glass.
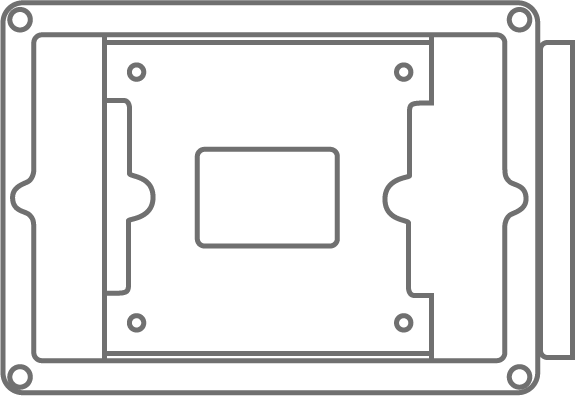
Side Mount
Best for mounting on the side of glass walls.
iPort
A charging system and mount with premium finishes.

Tablet Stand
A freestanding floor stand for iPads.
Recommended meeting room display placement
Recommended height
Standard height can range between 54′ to max 60″ height from finished floor to middle of iPad meeting room display or mount.
ADA Consideration – minimum 20″ to 48″ height max.
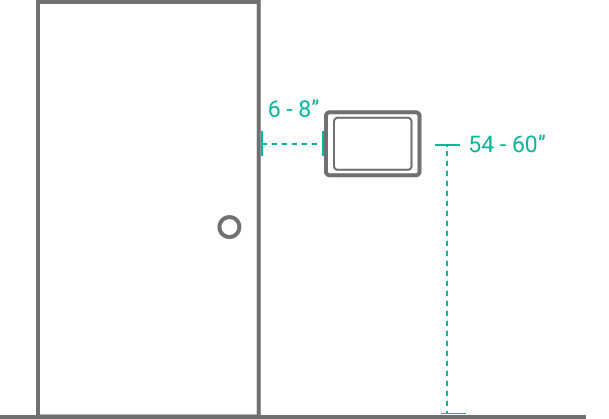
Distance from door
Consistent between all iPads at a distance of 6-8″ from door frame for wall mounts.
Want to know how to set up MDM for your displays?
Check out these posts on our blog:
Setting Up MDM for Your iPad Meeting Room Displays
Setting Up a Supervised iPad Meeting Room Display
Installing smart sensors
Guidelines
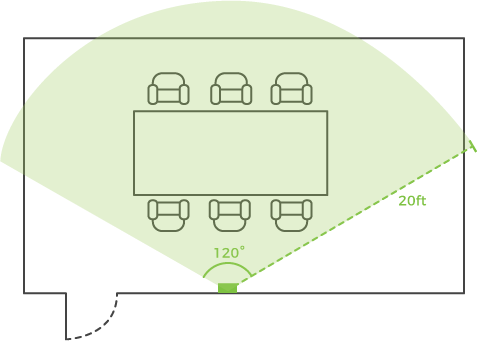
- Ensure the smart sensor does not face a doorway or entrance.
TIP: Mount the sensor beside the door to avoid this issue - Ensure nothing will obstruct the view of the smart sensor (doors, tv mounts/stands etc).
- Point sensor towards the centre of the room, not an empty area.
- Smart Sensors can’t see through glass.
- The smart sensor should be mounted 60″ to 80″ from finished floor.
- The smart sensor has a field of view of 120° and approximately 20ft.
Follow the mounting instructions provided with the sensor.
Required equipment

Smart Sensor
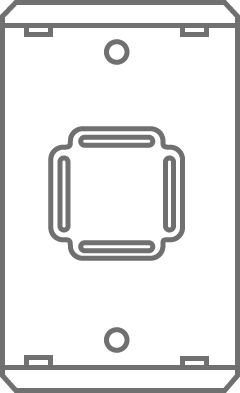
Sensor Mount
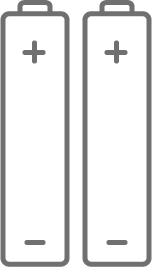
2 AAA batteries (included)
Pairing the sensor to the room display app
1. Open the app settings from the top left corner. App settings requires a device passcode. The room display must already be paired to a room before pairing a sensor.
2. Click “Pair Sensor” from the settings list. Workscape will scan for available sensors.
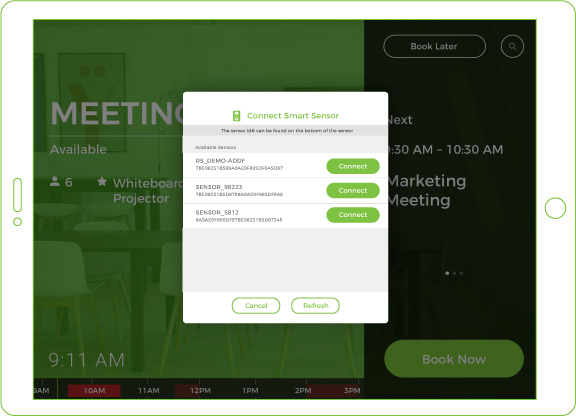
3. Click “Connect” to pair the smart sensor to the room display app. If you do not see your sensor, refresh the list. The sensor may be out of range (approx. 20-30 ft), be low on battery, or may be connected to another display. The unique smart sensor ID# can be found at the bottom of the sensor.
Device setup
1. Connect the iPad to your office’s wifi.
2. Download the Workscape Meeting Room Booking Display app from the app store.
3. Turn off auto-lock to keep the display on.
iOS 9: Settings > General > Auto-Lock > change Auto-Lock to Never.
iOS 10: Settings > Display & Brightness > Auto-Lock > change Auto-Lock to Never.
4. Turn on Guided Access to keep employees from exiting the Workscape app.
Settings > General > Accessibility > Guided Access
5. Open the Workscape Meeting Room Display app and press the home button 3 times to activate Guided Access. When the Guided Access screen appears, click start.
Admin features overview
Creating a room from the display
1. Sign in to the Workscape meeting room display app using your admin credentials or Workscape Pin, click the “Create a New Room” button from the left hand side of the screen.
2. On the next screen, fill in the room’s information and take or upload a photo of the room. This will be used on the display and the mobile app. The photo should be a minimum of 2048px by 1536px and should not exceed 500kb.
3. Link the room to a Google Resource or O365 Meeting Room Resource to connect it to your office’s calendar.
4. Save your new bookable space.
*Note: It may take up to 24 hours for the room to become fully synced and bookable.
Pairing a room to the display
Navigate to the room set-up screen by logging in to the room display or from the app settings screen. Simply click “Pair” from your available list of rooms to connect the meeting room display app to the room.
App Settings
The room display app settings are located in the upper left corner of the display screen. You must use your device passcode to access the settings screen. The default passcode is 0000. You can change this in device passcode in the iPad’s settings.
Dim Screen
Save power during off work hours by using the dim screen function. The screen will automatically brighten when the work day starts.
Device Passcode
Change your device passcode here. The default is 0000.
Workscape Login Pin
This pin is used for faster setup when installing multiple room displays. You can log in to the app using this pin instead of typing out your admin credentials every time. This pin can be generated in the app settings or in the Workscape Admin Console.
Pair Sensor
For Workscape + Sensor users
Learn how to pair your Workscape Smart Sensor here.
Change Room
This will take you to the room set up screen where you can pair the display to a different meeting room.
*Note: The iPad can be set to display time in 24 hr notation if you wish, but the Workscape Web App will show time in 12 hour notation.
Mounting your meeting room display
It is recommended that you set up the iPad meeting room display app and bookable space before mounting the device.
Please note that this is our recommended installation guide. Installing each meeting room display may differ depending on wall surface and room layout.
Click on the image to see where to buy each product.
iPad mini 2
Any iPad will work. Be sure to get the correct mounting frame.
Secure Mounting Frame
See below for mounting options.
Charging Cable
Any iPad compatible charging cable will work. Choose a length to best suit your space.
Mounting Options
Basic Wall Mount
Best for standard wall mounting.
PadTabs
For mounting directly on surfaces such as glass.
Side Mount
Best for mounting on the side of glass walls.
iPort
A charging system and mount with premium finishes.
Tablet Stand
A freestanding floor stand for iPads.
Recommended meeting room display placement
Recommended height
Standard height can range between 54′ to max 60″ height from finished floor to middle of iPad meeting room display or mount.
ADA Consideration – minimum 20″ to 48″ height max.
Distance from door
Consistent between all iPads at a distance of 6-8″ from door frame for wall mounts.
Want to know how to set up MDM for your displays?
Check out these posts on our blog:
Setting Up MDM for Your iPad Meeting Room Displays
Setting Up a Supervised iPad Meeting Room Display
Installing smart sensors
Guidelines
- Ensure the smart sensor does not face a doorway or entrance.
TIP: Mount the sensor beside the door to avoid this issue - Ensure nothing will obstruct the view of the smart sensor (doors, tv mounts/stands etc).
- Point sensor towards the centre of the room, not an empty area.
- Smart Sensors can’t see through glass.
- The smart sensor should be mounted 60″ to 80″ from finished floor.
- The smart sensor has a field of view of 120° and approximately 20ft.
Follow the mounting instructions provided with the sensor.
Required equipment
Smart Sensor
Sensor Mount
2 AAA batteries (included)
Pairing the sensor to the room display app
1. Open the app settings from the top left corner. App settings requires a device passcode. The room display must already be paired to a room before pairing a sensor.
2. Click “Pair Sensor” from the settings list. Workscape will scan for available sensors.
3. Click “Connect” to pair the smart sensor to the room display app. If you do not see your sensor, refresh the list. The sensor may be out of range (approx. 20-30 ft), be low on battery, or may be connected to another display. The unique smart sensor ID# can be found at the side of the sensor.
Device setup
What kind of tablet are you using?
1. Connect the iPad to your office’s wifi.
2. Download the Workscape Meeting Room Booking Display app from the app store.
3. Turn off auto-lock to keep the display on.
iOS 9: Settings > General > Auto-Lock > change Auto-Lock to Never.
iOS 10: Settings > Display & Brightness > Auto-Lock > change Auto-Lock to Never.
4. Turn on Guided Access to keep employees from exiting the Workscape app.
Settings > General > Accessibility > Guided Access
5. Open the Workscape Meeting Room Display app and press the home button 3 times to activate Guided Access. When the Guided Access screen appears, click start.
1. Connect your device to your office’s wifi.
2. Download the Workscape Meeting Room Display app from the Play Store.
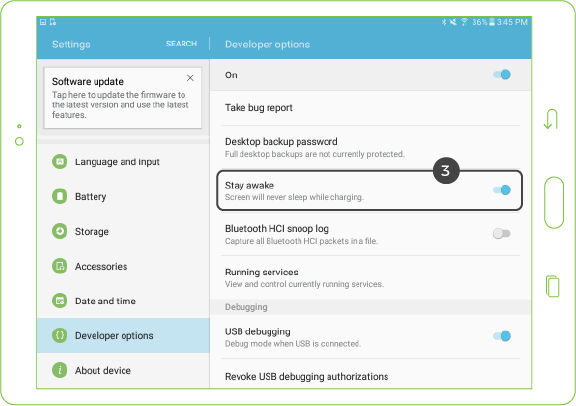
3. Make sure the display screen stays on while it’s plugged in. Go to your device’s Settings > Developer Options > enable Stay Awake.
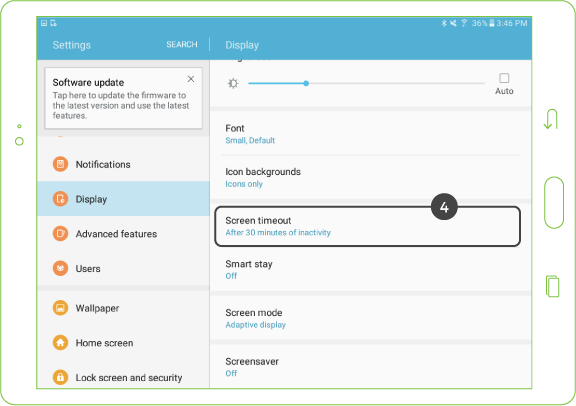
4. Make sure the screen stays on for as long as possible in case the tablet gets unplugged. Navigate to Display > Screen Timeout > choose the longest option available.
5. Lock the screen to the Workscape app to keep employees from exiting it.
In Settings, go to Lock screen and security > Other security settings > Pin Windows > Enable.
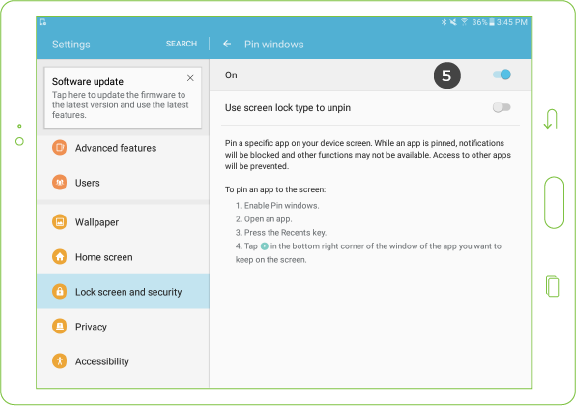
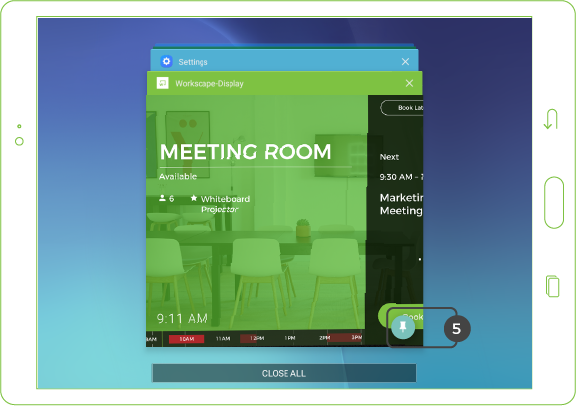
Open Workscape and click the recents button on your device to show all open apps. Click the pin button at the button of the Workscape window.
To unpin the app, hold the Recents button and the back button on your device at the same time.
Admin features overview
Creating a room from the display
1. Sign in to the Workscape meeting room display app using your admin credentials or Workscape Pin, click the “Create a New Room” button from the left hand side of the screen.
2. On the next screen, fill in the room’s information and take or upload a photo of the room. This will be used on the display and the mobile app. The photo should be a minimum of 2048px by 1536px and should not exceed 500kb.
3. Link the room to a Google Resource or O365 Meeting Room Resource to connect it to your office’s calendar.
4. Save your new bookable space.
*Note: It may take up to 24 hours for the room to become fully synced and bookable.
Pairing a room to the display
Navigate to the room set-up screen by logging in to the room display or from the app settings screen. Simply click “Pair” from your available list of rooms to connect the meeting room display app to the room.
App Settings
The room display app settings are located in the upper left corner of the display screen. You must use your device passcode to access the settings screen. The default passcode is 0000.
Dim Screen
Save power during off work hours by using the dim screen function. The screen will automatically brighten when the work day starts.
Device Passcode
Change your device passcode here. The default is 0000.
Workscape Login Pin
This pin is used for faster setup when installing multiple room displays. You can log in to the app using this pin instead of typing out your admin credentials every time. This pin can be generated in the app settings or in the Workscape Admin Console.
Pair Sensor
For Workscape + Sensor users
Learn how to pair your Workscape Smart Sensor here.
Change Room
This will take you to the room set up screen where you can pair the display to a different meeting room.
*Note: The iPad can be set to display time in 24 hr notation if you wish, but the Workscape Web App will show time in 12 hour notation.
Mounting your meeting room display
What kind of tablet are you using?
Please note that this is our recommended installation guide. Installing each meeting room display may differ depending on wall surface and room layout.
iPad Mounting
It is recommended that you set up the iPad meeting room display app and bookable space before mounting the device.
Click on the image to see where to buy each product.
iPad mini 2
Any iPad will work. Be sure to get the correct mounting frame.
Secure Mounting Frame
See below for mounting options.
Charging Cable
Any iPad compatible charging cable will work. Choose a length to best suit your space.
Mounting Options
Basic Wall Mount
Best for standard wall mounting.
PadTabs
For mounting directly on surfaces such as glass.
Side Mount
Best for mounting on the side of glass walls.
iPort
A charging system and mount with premium finishes.
Tablet Stand
A freestanding floor stand for iPads.
Android Tablet Mounting
Recommended meeting room display placement
Recommended height
Standard height can range between 54′ to max 60″ height from finished floor to middle of iPad meeting room display or mount.
ADA Consideration – minimum 20″ to 48″ height max.
Distance from door
Consistent between all iPads at a distance of 6-8″ from door frame for wall mounts.
Want to know how to set up MDM for your displays?
Check out these posts on our blog:
Setting Up MDM for Your iPad Meeting Room Displays
Setting Up a Supervised iPad Meeting Room Display
Installing smart sensors
Guidelines
- Ensure the smart sensor does not face a doorway or entrance.
TIP: Mount the sensor beside the door to avoid this issue - Ensure nothing will obstruct the view of the smart sensor (doors, tv mounts/stands etc).
- Point sensor towards the centre of the room, not an empty area.
- Smart Sensors can’t see through glass.
- The smart sensor should be mounted 60″ to 80″ from finished floor.
- The smart sensor has a field of view of 120° and approximately 20ft.
Follow the mounting instructions provided with the sensor.
Required equipment
Smart Sensor
Sensor Mount
2 AAA batteries (included)
Pairing the sensor to the room display app
1. Open the app settings from the top left corner. App settings requires a device passcode. The room display must already be paired to a room before pairing a sensor.
2. Click “Pair Sensor” from the settings list. Workscape will scan for available sensors.
3. Click “Connect” to pair the smart sensor to the room display app. If you do not see your sensor, refresh the list. The sensor may be out of range (approx. 20-30 ft), be low on battery, or may be connected to another display. The unique smart sensor ID# can be found at the bottom of the sensor.